
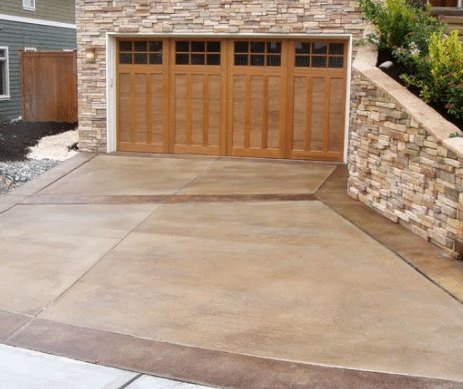
Acid stain is not a new technique; in the past, many people used this technique. People used a dye or coloring substance with water-based minerals and sprayed it on concrete. These minerals penetrated deep to give a stain mark; later, they sealed it with water sealers to get the finish. Acid stain floors are an economical option suitable for outdoor concrete floorings and basement floors; you can also customize them with your choice of color and design.
We will tell you everything about the stained concrete floors and give you a step-by-step DIY guide to acid-stain concrete floors.
Contents
- 1 What Exactly Is An Acid-stained Floor?
- 2 How Much Will It Cost To Acid-stain The Concrete Floor?
- 3 A Complete Step by Step Guide to Acid Stain Concrete Floors
- 4 STEP 1: Get The Material
- 5 STEP 2: Cleaning The Floor
- 6 STEP 3: Apply Etching Solution To Concrete
- 7 STEP 4: Applying Acid Stain
- 8 STEP 5: Clean And Neutralize The Surface
- 9 STEP 6: Sealing The Floor
- 10 Conclusion
What Exactly Is An Acid-stained Floor?

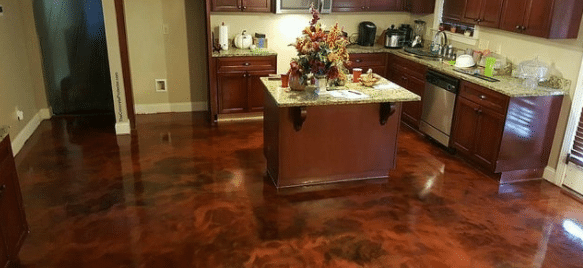
Acid stain floors are different from a topcoat floor that uses paint coats. These are lustrous stains that engrave deep and change the color of the concrete because of a chemical reaction. Hydrated lime is typical for this kind of chemical reaction.
How Much Will It Cost To Acid-stain The Concrete Floor?

Acid staining concrete floor costs much less than wall-to-wall carpet, tiling, marble floors, or wooden flooring. The acid stain floor cost ranges from $0.40 to $10.00 per square foot depending upon the surface, design, and material. The price comes down if you learn how to do it yourself!
A Complete Step by Step Guide to Acid Stain Concrete Floors
Before the acid staining process begins, ensure that the concrete floor is smooth and free of grease, paint stains, adhesives, or any other wood or mud stain. Preparing a smooth concrete surface is critical before starting with the process. We will threadbare the cleaning process in step two.
STEP 1: Get The Material
Here is a list of tools and materials for acid staining your concrete floors. Get all the material and get started!
List Of Materials
- Concrete-based Sealer
- Baking Soda (For Cleaning The Floor)
- Acid Stain (Commercially Available)
- Surface Wax
- Concrete Cleaning Solution
- Concrete Etching Solution
List Of Tools
- Pump Sprayer X 2
- Plastic Sheet And Adhesive Tape To Cover The Walls
- Rubber Gloves And Knee-length Rubber Boots
- Natural Bristle Push Broom For Cleaning
- Protective Eyewear/Shield
- Vacuum Cleaner
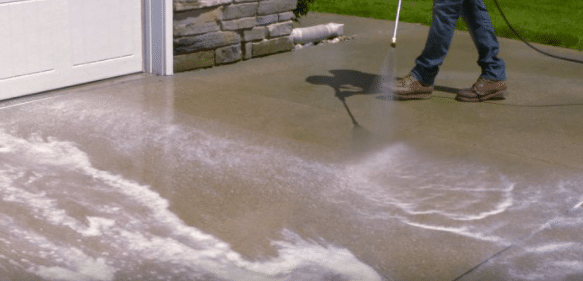
STEP 2: Cleaning The Floor
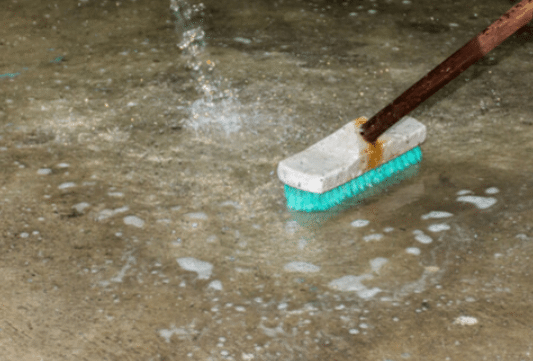
Clean the concrete thoroughly to remove any visible paint, adhesive, mud, or grease. Use a scraper to scrape off dried paint, soil, or any other material. Ensure the surface is smooth and even before we start with the next step. Lastly, use a vacuum cleaner to clear debris, dirt, and dust.
STEP 3: Apply Etching Solution To Concrete
In a mop bucket, mix one part of the etching solution into four parts of water. You can do the entire area at once; however, we recommend selecting a smaller area of 10 ft by 10 ft for a better finish. Scrub the area with a brush and let it stand for five to ten minutes.
Mop the floor section with an etching solution. You can also use a detergent instead of an etching solution. Repeat the process for all sections of the floor. Rinse and clean the residue in each area.
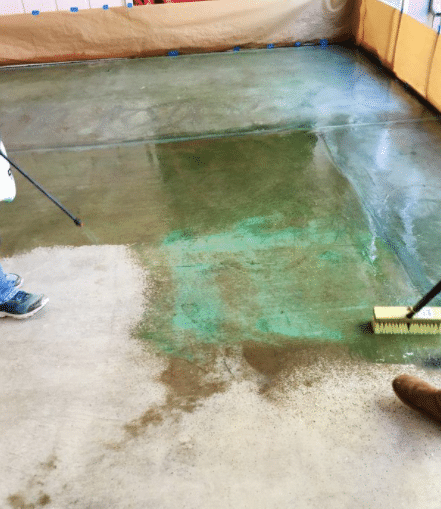
STEP 4: Applying Acid Stain

You will need to pump sprayers for this process. Mask all the walls with plastic sheets and adhesive tape. Fill one pump sprayer with acid stain and the other with clean water. Mix the dye with the solvent according to the choice of color.
Work on 10ft-by-10ft sections. Spray water first to moist the floor, and then spray the acid stain mixed with dye.
Here Are Some Tips For Desired Effects
- Spray in a circular motion for an even-toned effect.
- Use a paintbrush to stroke in a circular motion and spray an additional coat for a dark-toned finish.
- Spray directly for a diffused-toned finish.
- Apply a heavy coat and instantly smear accent coats. Continue dark and light accent till you get the desired result for a marble-toned finish.
- Repeat the process for the entire floor.
STEP 5: Clean And Neutralize The Surface
Let the stain settle for 24 hours. Make a cleaning solution of baking soda in water. You can easily make this solution by mixing two to three tablespoons of baking soda in one gallon of clean water. Spray the solution on the floor using a pump spray. Ensure that the cleaning solution is sprayed evenly all over the concrete floor.
Brush with a natural bristle push broom and wipe with a soft scrub to clean all leftover deposits. Wash the concrete surface with clean water to remove excess color and any residue.
Leave the surface to dry for a few hours. Once the surface is dried, move onto the next step.
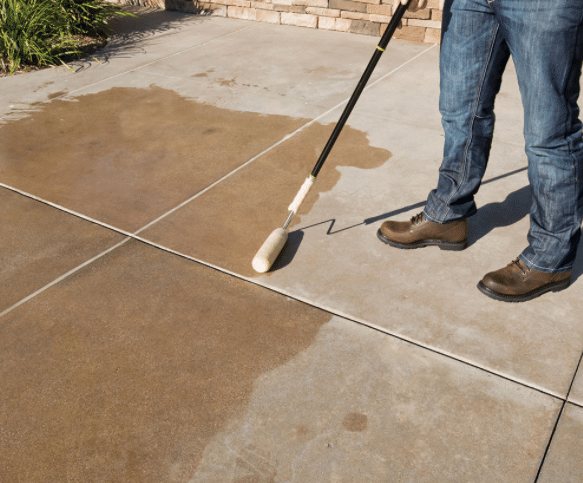
STEP 6: Sealing The Floor
Ensure the floor is completely dry. You can use fans or heaters for quick drying. It is advisable to use acrylic sealers for a satin-smooth finish than solvent-based sealers.
Pour the sealer into a paint pan and spread it evenly using a paint roller. Apply two to three coats for a smooth finish. Let the first coat dry before applying the next coat each time.
You can also apply floor wax polish to protect the floor coating from wear and tear. Consistent use of wax polish every three to four months will protect your floor from damages and increase the floor’s durability.
Never apply water-based sealers when the temperature is below 65 degrees Fahrenheit.
Conclusion
Try these six easy steps to get your acid-stain concrete. These do-it-yourself tricks will help as a guide and save you labor costs as well. Getting an acid stain is an effective way to do your outdoor flooring and basements. Just ensure you have safety gear for adequate protection.